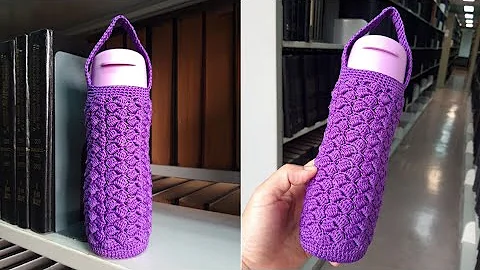
Creative Crochet Holder for Water Bottles and Coffee Mugs
Table of Contents
- Introduction
- Materials Needed
- Crochet Pattern Selection
- Creating the Base of the Bag
- Adding the Cross Double Stitch
- Working the Single Stitch Rows
- Customizing the Size of the Bag
- Finishing the Bag with a Handle
- Testing the Fit with a Water Bottle or Mug
- Conclusion
Introduction
Welcome to my channel! In this video, I will be showing you how to create a cute crochet bag that can hold your water bottle or coffee mug. Not only is it functional, but it also adds a stylish touch to your everyday carry. Whether you're a beginner or experienced in crochet, this pattern is simple and easy to follow. So let's get started and make a bag that suits your personal style.
Materials Needed
Before we begin, let's gather the materials you'll need for this project. Here's a list of what you'll need:
- Yarn (preferably not too thick)
- Crochet hook (size 3mm)
- Scissors
Make sure to choose yarn colors that you love and complement each other. You can also use leftover yarn for this project, making it a great way to utilize those extra skeins.
Crochet Pattern Selection
The first step in creating your crochet bag is selecting the pattern you want to use. There are countless patterns available, so feel free to choose one that resonates with your personal style. For this tutorial, we will be using the cross double crochet stitch. However, you can choose any pattern that catches your eye.
Creating the Base of the Bag
To start, we will create the base of the bag. This will serve as the foundation for the rest of the project. Here's how you can do it:
- Start by chaining four stitches.
- Use a slip stitch to join the last stitch to the first stitch, creating a circle.
- Make ten double crochets into the circle.
- Chain three stitches and then make one double crochet into the same stitch.
- Chain one stitch and then make two double crochets into the next stitch.
- Repeat the pattern of two double crochets and one chain stitch until you complete the row.
- Slip stitch into the third chain of the initial chain three to finish the row.
Adding the Cross Double Stitch
Once the base is complete, we will move on to adding the cross double stitch to create a textured pattern. The cross double stitch adds visual interest and helps the bag to maintain its shape. Here's how you can do it:
- Chain three stitches to serve as the first cross double crochet.
- Yarn over and insert your hook into the previous stitch, making a double crochet.
- Skip the next stitch and insert your hook into the following stitch from the back, making another double crochet.
- Repeat this pattern of skipping a stitch and making a cross double crochet until you complete the row.
- Slip stitch into the first stitch of the row to finish.
Working the Single Stitch Rows
After adding the cross double stitch row, we will switch back to a row of single stitches. This helps to create contrast and balance in the pattern. Here's how you can do it:
- Chain one stitch in the same stitch as joining.
- Make one single crochet stitch in each stitch around.
- Continue this pattern until you complete the row.
- Slip stitch into the first stitch of the row to finish.
Customizing the Size of the Bag
At this point, you can begin customizing the size of your bag. The length of the bag will depend on the size of the water bottle or mug you plan to carry. Feel free to make it longer or shorter according to your preferences. Remember to maintain the stitch count and pattern consistency.
Finishing the Bag with a Handle
To give the bag a finished look and allow for easy carrying, we will add a handle. Here's how you can do it:
- Complete the necessary number of rows to reach the desired length.
- Fold the bag in half and locate the center point.
- Join the yarn at the center point from the inside of the bag.
- Chain three stitches and make one double crochet in each stitch.
- Continue this pattern until you reach the end of the row.
- Slip stitch to join and secure the handle.
Testing the Fit with a Water Bottle or Mug
Before we conclude, it's important to test the fit of the bag with a water bottle or mug. Ensure that it fits securely and comfortably inside the bag without being too loose or too tight. If necessary, make adjustments to the size and shape to better accommodate your preferred item.
Conclusion
Congratulations! You have successfully created a crochet bag that can hold your water bottle or coffee mug. This versatile accessory not only adds a touch of style to your everyday life but also showcases your crochet skills. Feel free to explore different patterns, colors, and variations to make the bag truly your own. Thank you for watching, liking, subscribing, and I'll see you in the next video. Have a great day!
Highlights
- Learn how to crochet a cute bag for your water bottle or coffee mug
- Choose from various crochet patterns to personalize your bag
- Create a sturdy base and add a textured cross double stitch for visual interest
- Maintain pattern consistency by alternating rows of single stitches
- Customize the size of your bag to fit your specific needs
- Finish off with a stylish handle for easy carrying
- Test the fit of your bag with a water bottle or mug
- Showcase your crochet skills and add a touch of style to your everyday life
 Beauty


 WHY YOU SHOULD CHOOSE BEAUTYBADY