Learn the Beautiful Crochet Primrose Stitch
Table of Contents
- Introduction
- Understanding the Primrose Stitch
- Materials Needed
- Step-by-Step Tutorial for the Primrose Stitch
- Step 1: Chain and Begin the First Row
- Step 2: Create the Double Crochet Clusters
- Step 3: Repeat the Second Row
- Step 4: Continue the Pattern
- Step 5: Finishing the Primrose Stitch
- Tips and Tricks for Working with the Primrose Stitch
- Pros and Cons of the Primrose Stitch
- Variations and Customization Options
- Projects You Can Create with the Primrose Stitch
- Frequently Asked Questions (FAQ)
- Conclusion
The Primrose Stitch: A Beautiful and Easy Crochet Tutorial
Crochet is a hobby that allows you to create beautiful and intricate designs, and the Primrose stitch is no exception. If you're a beginner looking for a simple yet stunning stitch to add to your repertoire, then the Primrose stitch is perfect for you. In this tutorial, we will guide you through the step-by-step process of creating the Primrose stitch, from understanding the stitch pattern to finishing your project. So grab your crochet hook and yarn, and let's get started!
Understanding the Primrose Stitch
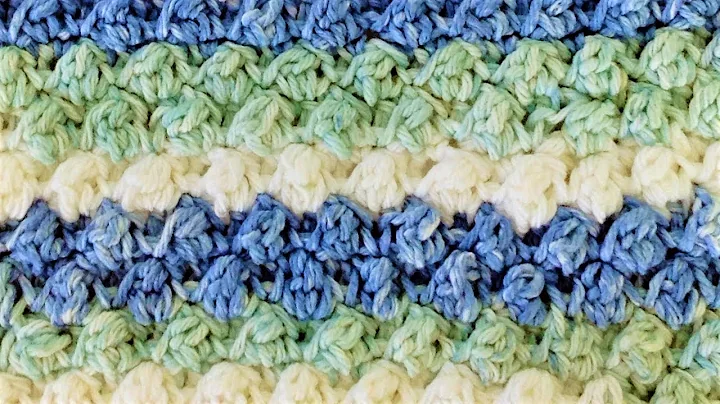
The Primrose stitch is a versatile crochet stitch that creates a textured pattern resembling the delicate petals of the primrose flower. It is a two-row repeat pattern that is easy to memorize, making it suitable for both beginner and experienced crocheters. The stitch works with multiples of three plus one additional chain. By mastering this stitch, you can create a variety of projects such as scarves, blankets, shawls, and more.
Materials Needed
Before we dive into the tutorial, let's gather the materials you will need to create the Primrose stitch. Here's a list of what you'll need:
- Yarn: Choose a yarn that matches your project's requirements. Any yarn weight can be used for the Primrose stitch, but it is recommended to use a medium to bulky weight yarn for better stitch definition.
- Crochet Hook: Select a crochet hook size that corresponds to your chosen yarn. The recommended hook size for the Primrose stitch is typically between 4mm to 5mm, depending on the yarn thickness.
- Scissors: A pair of sharp scissors will be handy for cutting the yarn.
- Yarn Needle: This will be used for weaving in the loose ends of your project.
Now that we have everything we need, let's dive into the tutorial and learn how to create the beautiful Primrose stitch.
Step-by-Step Tutorial for the Primrose Stitch
Step 1: Chain and Begin the First Row
To start, make a foundation chain with a multiple of three stitches, plus one additional chain. For example, if you want to create a swatch, you can chain 15 stitches, plus one more for a total of 16 stitches. This number can be adjusted based on the size of your desired project. Once you have chained the required number of stitches, you're ready to begin.
Skip the first chain (the one closest to the hook) and insert your hook into the second chain.
Step 2: Create the Double Crochet Clusters
In this step, we will create the double crochet clusters that form the distinctive petals of the Primrose stitch. Follow these instructions:
- Make one single crochet in the second chain from the hook.
- Chain two stitches.
- Insert your hook back into the same chain stitch you just worked the single crochet in.
- Make another single crochet in the same stitch.
- Skip two chains and then make one single crochet in the next chain.
- Chain two stitches.
- Repeat step 3 by inserting your hook back into the same chain stitch you just worked the single crochet in.
- Repeat step 4 by making another single crochet in the same stitch.
- Continue this pattern - skip two chains, make one single crochet in the next chain, chain two stitches, make one single crochet in the same stitch - until you reach the end of the row.
Step 3: Repeat the Second Row
Now that you've completed the first row, it's time to repeat the second row. This row will add height to the double crochet clusters and create the beautiful texture of the Primrose stitch.
- Chain three stitches at the beginning of the row. This will act as the height for the double crochet clusters.
- Turn your work.
- Locate the first cluster from the previous row. Find the middle double crochet of the cluster and insert your hook into it.
- Make one single crochet in the middle double crochet of the cluster.
- Chain two stitches.
- Insert your hook back into the same stitch you just worked the single crochet in.
- Make another single crochet in the same stitch.
- Repeat steps 3 to 7 for each cluster in the row.
- At the end of the row, create a half double crochet in the third chain of the beginning chain-three from the previous row.
Step 4: Continue the Pattern
To continue working the Primrose stitch, you will repeat the second row. Each time you repeat the second row, you will chain three at the beginning and work single crochets, chains, and single crochets in the middle double crochet of each cluster. This repetition will create the beautiful Primrose pattern throughout your project.
Step 5: Finishing the Primrose Stitch
Continue repeating the second row until your desired length or project size is achieved. Once you are satisfied with your work, fasten off the yarn by cutting it a few inches from the last stitch and pulling the tail through the final loop.
Weave in any loose ends using a yarn needle to secure them and give your project a polished finish.
Tips and Tricks for Working with the Primrose Stitch
- When working the Primrose stitch, pay attention to your tension. You want to make sure your stitches are not too tight or too loose, as this can affect the overall look and drape of your project.
- If you're a beginner, it may be helpful to practice the stitch on a small swatch before starting a larger project. This will help you familiarize yourself with the stitch pattern and allow you to make any necessary adjustments.
- Experiment with different yarn types and colors to create unique effects with the Primrose stitch. Variegated yarns can add depth and dimension to your project, while solid colors can highlight the textured pattern.
- Feel free to customize the Primrose stitch by adding additional rows, incorporating different stitch patterns within the clusters, or changing the spacing between the double crochet clusters. Let your creativity shine!
Pros and Cons of the Primrose Stitch
Every crochet stitch has its advantages and considerations. Here are the pros and cons of working with the Primrose stitch:
Pros:
- The Primrose stitch is relatively easy to learn, making it suitable for beginners.
- The stitch pattern creates a beautiful texture that adds interest to any project.
- It works well with a variety of yarn types and thicknesses, allowing for endless customization options.
- The two-row repeat pattern is easy to memorize, making it perfect for working on-the-go or while watching your favorite show.
Cons:
- The Primrose stitch can be slightly time-consuming due to the two-row repeat pattern. However, once you get into the rhythm, it becomes faster to work.
- If you prefer a more open or lacy stitch, the Primrose stitch may not be the best choice. Its tight clusters create a denser fabric.
Variations and Customization Options
While the Primrose stitch is beautiful on its own, you can further customize and adapt it to suit your preferences. Here are a few variations and ideas to inspire you:
- Size Variations: Adjust the size of your project by changing the number of chains in your foundation chain or adding or subtracting rows. This allows you to create anything from small accessories to larger garments or home decor items.
- Color Changes: Experiment with color changes to create striped or ombre effects within your project. Choose complementary or contrasting colors to add visual interest to your Primrose stitch.
- Embellishments: Enhance your Primrose stitch projects with embellishments such as buttons, beads, or ribbons. These small additions can take your projects to the next level and make them truly unique.
Projects You Can Create with the Primrose Stitch
The Primrose stitch is highly versatile and can be used to create a wide range of projects. Here are a few ideas to get you started:
- Primrose Stitch Scarf: Wrap yourself in warmth and style with a Primrose stitch scarf. Choose a soft, cozy yarn in your favorite color and enjoy the elegant texture of the stitch as you create a practical accessory.
- Primrose Stitch Baby Blanket: Crochet a beautiful and cozy blanket for a little one using the Primrose stitch. This stitch creates a lovely textured fabric that will keep them warm and snug.
- Primrose Stitch Headband: Keep your hair in place and add a touch of elegance to your hairstyle with a Primrose stitch headband. Choose a vibrant yarn color to create a stylish accessory that complements your outfits.
Remember, these are just a few ideas, and the possibilities are endless. Let your creativity guide you when choosing projects to showcase the beauty of the Primrose stitch.
Frequently Asked Questions (FAQ)
Q: Is the Primrose stitch suitable for beginners?
A: Yes, the Primrose stitch is beginner-friendly. It only involves basic crochet techniques such as chaining, single crochet, double crochet, and working in rows. With a little practice, beginners can easily master this stitch.
Q: Can I use any type of yarn for the Primrose stitch?
A: Yes, you can use any type of yarn for the Primrose stitch. However, keep in mind that the stitch pattern will be more pronounced with medium to bulky weight yarns. Thinner yarns may result in a more delicate look.
Q: How can I adjust the size of my Primrose stitch project?
A: To adjust the size of your project, you can either change the number of stitches in your foundation chain or add or subtract rows. Remember to keep the stitch count in multiples of three, plus one additional chain.
Q: Can I use the Primrose stitch for circular projects?
A: While the Primrose stitch is typically used for flat projects, such as scarves or blankets, it is possible to adapt it for circular projects like hats or cowls. You will need to adjust the stitch pattern to work in the round.
Q: How do I weave in the loose ends of my Primrose stitch project?
A: To weave in the loose ends, thread a yarn needle with the tail of your yarn and weave it under the stitches of your project. Make sure to secure the ends by weaving them back and forth to prevent unraveling.
Conclusion
The Primrose stitch is a beautiful and versatile crochet pattern that is perfect for both beginner and experienced crocheters. With its simple two-row repeat, you can create stunning projects such as scarves, blankets, headbands, and more. So grab your crochet hook and yarn, and start exploring the world of the Primrose stitch. Let your creativity bloom as you bring this delightful stitch to life!
 WHY YOU SHOULD CHOOSE BEAUTYBADY


