Learn to Create Beautiful Modified Mini Bean Stitches
Table of Contents
- Introduction
- Materials Needed
- Making the Mini Bean Stitch
- Working the Bobble Border
- Changing Yarn Colors
- Adjusting the Blanket Size
- Tips for Crocheting with Worsted Weight Yarn
- How to Finish and Fasten Off
- Optional Embellishments
- Conclusion
Introduction
Welcome to this tutorial on how to crochet a lovely blanket! In this article, we will walk you through the step-by-step process of creating a beautiful 18-inch square blanket, perfect for a last-minute baby gift. We will also discuss variations in size and provide helpful tips for working with different yarns. So, grab your crochet hook and let's get started!
Materials Needed
Before diving into our crochet project, let's gather all the materials we will need. Here's what you'll need:
- Worsted weight yarn
- J crochet hook
Remember, for the lovey-size blanket, you will chain 51. However, for this tutorial, we will be using a smaller swatch with only 11 chains.
Making the Mini Bean Stitch
The first stitch we'll learn is the mini bean stitch, which forms the basis of our blanket. Here's how you can make the mini bean stitch:
- Begin by inserting your hook under the top two loops of the third chain from the hook.
- Pull up a loop, creating two loops on your hook.
- Yarn over and insert your hook into the same chain, pulling up another loop. Now, you have four loops on your hook.
- Pull the yarn through all four loops, forming the mini bean stitch.
- Chain one and skip the next stitch.
- Repeat steps 1-4 in the next chain, creating another mini bean stitch.
- Continue working mini bean stitches, chaining one between each stitch, until you reach the end of the row.
Working the Bobble Border
One of the most fun parts of this blanket is the bobble border. While the detailed instructions for the border can be found in the written pattern, let's briefly go through the steps here:
- Choose a contrasting color of yarn for the bobble border.
- Attach the yarn to the edge of the blanket.
- Work a series of bobbles around the border, spacing them evenly.
- Finish off the bobble border and weave in any loose ends.
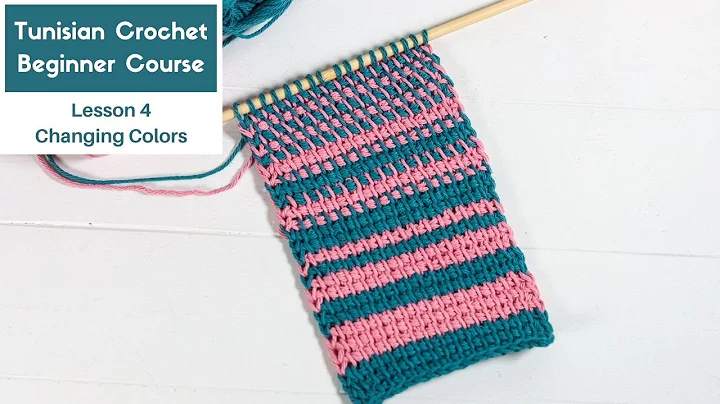
Changing Yarn Colors
If you want to add some variety to your blanket, you can easily change yarn colors. Here are the steps to do it:
- When you reach the last step of the current row, simply drop the old color.
- Pick up the new color and pull it through the last loop of the old color.
- Continue crocheting with the new color until you're ready to switch again.
Remember to secure the yarn tails as you go to avoid any unraveling.
Adjusting the Blanket Size
While we are working on the small lovey-size blanket in this tutorial, you may want to customize the size of your blanket. Here's how you can make it larger or smaller:
- To make it larger: Increase the initial chain count by multiples of the stitch pattern. For example, if the stitch pattern requires a multiple of 3 chains, you can chain any multiple of 3 to make the blanket wider.
- To make it smaller: Decrease the initial chain count by multiples of the stitch pattern. Again, make sure to follow the pattern's required multiples.
Remember to adjust the number of rows accordingly to maintain the desired proportions.
Tips for Crocheting with Worsted Weight Yarn
Crocheting with worsted weight yarn is a joy, but it comes with its own challenges. Here are some tips to make your crocheting experience smoother:
- Use a crochet hook size that complements the yarn weight.
- Pay attention to your tension and strive for even stitches.
- Take breaks to avoid hand fatigue.
- When changing colors, make sure to carry the yarn neatly along the edge to avoid tangling.
- Check your gauge before starting to ensure the correct size.
How to Finish and Fasten Off
When your blanket measures the desired size, it is time to finish it off and secure the stitches. Here's how you can do it:
- Cut the yarn, leaving a long tail.
- Pull the tail through the loop on your hook to fasten off.
- Use a yarn needle to weave in the loose ends, ensuring a clean finish.
Congratulations, your blanket is complete!
Optional Embellishments
If you want to add a personal touch to your blanket, consider these optional embellishments:
- Attach a decorative border using a contrasting color yarn.
- Add pom-poms or tassels to the corners of the blanket.
- Sew on fabric appliques or embroidered motifs.
These embellishments can make your blanket truly unique and special.
Conclusion
In this tutorial, we have walked you through the process of crocheting a lovely blanket. From the mini bean stitch to the bobble border, we hope you enjoyed learning these techniques. Remember, you can customize the size and add your unique touches to make each blanket a beautiful work of art. Happy crocheting!
Highlights
- Learn how to crochet a beautiful 18-inch square blanket
- Create the mini bean stitch, the foundation of the blanket
- Add a fun bobble border for extra charm
- Customize the size of the blanket to your preference
- Tips for working with worsted weight yarn
- Finish the blanket with a clean and neat fastening off technique
- Optional embellishments to personalize your blanket
- Enjoy the process of crocheting and create a unique piece of art
FAQ
Q: Can I use a different yarn weight for this project?
A: While the instructions are specifically designed for worsted weight yarn, you can experiment with other yarn weights and adjust the hook size accordingly. Keep in mind that it may affect the final size and texture of the blanket.
Q: Can I make a larger blanket using this pattern?
A: Absolutely! The pattern can be easily adjusted to create larger blankets. Simply increase the initial chain count and follow the stitch pattern accordingly. You may also need to add more rows to achieve the desired size.
Q: Are there any alternative border options?
A: Yes! While the tutorial focuses on the bobble border, you can explore different border options to suit your preferences. Consider trying a simple scalloped edge or a picot border for a delicate finish.
Q: Can I use this pattern to make a different shape of blanket?
A: The tutorial demonstrates how to create a square blanket. However, with some modifications to the initial chain count and stitch pattern, you can adapt the pattern to make rectangular or even circular blankets.
Q: How long does it take to complete this blanket?
A: The time it takes to complete the blanket depends on your crocheting speed and the size of the project. As this tutorial covers a small lovey-size blanket, it can be completed within a few hours or a couple of days, depending on how much time you dedicate to crocheting.
 Beauty


 WHY YOU SHOULD CHOOSE BEAUTYBADY