Master Crocheting Button Holes with Easy Steps
Table of Contents:
- Introduction
- Working the Buttonholes
- Applying Slip Stitch Ribbing
3.1 Repeating Rows One and Two
- Working the Buttonhole Rows
4.1 Chaining and Turning
4.2 Slip Stitching in the Back Loop
4.3 Slip Stitching into the Front Panel
4.4 Evenly Spacing the Buttonhole Rows
4.5 Using Stitch Markers
- Sewing the Buttons
5.1 Lining up the Buttons
5.2 Threading the Needle
5.3 Knotting the Thread
5.4 Sewing on the Button
5.5 Securing the Button
5.6 Sewing in the Ends
- Conclusion
Working the Buttonholes
In this article, we will guide you through the process of working buttonholes for the Ice Cream Party Cardi. Once you've completed the front panel, you'll need to repeat rows one and two of the applied slip stitch ribbing before starting the buttonhole rows. For size two, this may need to be repeated more times if you're working a different size.
Applying Slip Stitch Ribbing
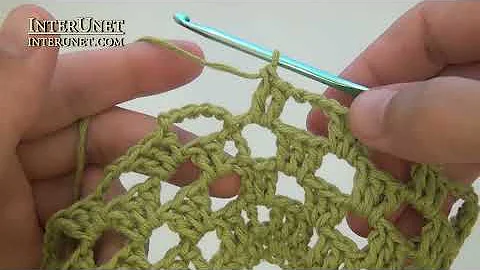
To begin the process of working the buttonholes, chain one and turn. Next, work slip stitches in the back loop of the first two slip stitches, followed by chaining two. Skip two slip stitches and slip stitch in the next two slip stitches in the back loop only. Then, slip stitch two into the front panel while ensuring the even spacing of three crochet ribbing rows for every two half double crochet row ends. Repeat this process until you reach the desired point to place your next buttonhole.
Working the Buttonhole Rows
To work the buttonhole rows, you'll need to skip the first two slip stitches from the previous row. Slip stitch into the next two slip stitches in the back loop only. When you reach the buttonhole, place two single crochets inside the chain two space. Continue slip stitching in the back loop only of the next two slip stitches. Remember to evenly space out your buttonholes, approximately every six ribbing rows for size two, adjusting for larger sizes. Using locking stitch markers can help you gauge proper spacing before starting the buttonhole rows.
Sewing the Buttons
Once all the buttonholes are in place, it's time to sew the buttons onto the opposite side of the cardigan. Start by overlapping the two front pieces and secure them with a locking stitch marker. Proceed to sew buttons onto the ribbing of the side where the buttons are positioned. Use a sewing needle and coordinating thread for this task.
Lining up the Buttons
To ensure the buttons align with the buttonholes, place the button over the buttonhole and come up from the bottom, just until you feel the resistance knot. This knot should provide a slight resistance to prevent the thread from coming loose. Then, go down and back up through the fabric, making sure the thread is properly secured and snug.
Threading the Needle
Using a sewing needle, thread your double-layered thread. This will provide durability, especially when working with cheaper cotton threads that can easily snap. Create knots at the end of the thread to secure it in place and prevent tangling.
Knotting the Thread
To sew on the buttons, start by removing the marker and placing the button over the buttonhole. From the bottom, go up until you hit the resistance knot. Be careful not to pull too hard and risk pulling the thread through. After going down and back up, ensuring the thread is properly positioned, come up between the fabric and the button, tightly winding the thread around the button a couple of times. Return back up through the button and then back down, repeating this process once more. Finally, knot the two ends of the thread together to secure the button.
Sewing in the Ends
To finish off the sewing process, make tiny stitches through the fabric, going up and down multiple times in the same area. This creates a thick layer of thread that is more secure. After a few passes, knot the two ends of the thread together, creating a double overhand knot. Trim the ends of the thread, ensuring minimal visibility on the inside of the cardigan.
By following these steps, you'll be able to successfully work the buttonholes for the Ice Cream Party Cardi and sew on the buttons with precision. Enjoy crafting and don't forget to share your finished projects on social media using the hashtag #IceCreamPartyCardi. Happy crafting!
Pros:
- Clear instructions for working buttonholes and sewing buttons
- Tips for evenly spacing the buttonholes using stitch markers
- Detailed explanation of seaming techniques
Cons:
- Could provide more visual aids or diagrams for clarity
- Limited explanation of alternative buttonhole techniques
Highlights:
- Easy-to-follow instructions for working buttonholes and sewing buttons
- Tips for evenly spacing buttonholes using stitch markers
- Step-by-step explanation of seaming techniques
- Recommendations for using double-layered thread for durability
FAQ
Q: How many buttonholes should I make for the Ice Cream Party Cardi?
A: The pattern suggests making six buttonholes, but you can modify it to fit your preference.
Q: How do I ensure the buttons align with the buttonholes?
A: Use locking stitch markers to mark out the desired button placement in advance. This will help you evenly space the buttons and keep them aligned with the buttonholes.
Q: Can I use a different thread for sewing on the buttons?
A: It's recommended to use coordinating thread to ensure a seamless finish. However, you can use a thread that matches your button or the fabric if you prefer.
Q: Is there an alternative way to sew on buttons?
A: Yes, there are different methods to sew on buttons. The article provides a simplified technique, but more professional tutorials can be found online for a more elaborate process.
 Beauty


 WHY YOU SHOULD CHOOSE BEAUTYBADY