Master the Slip Stitch Method for Joining Granny Squares
Table of Contents
- Introduction
- What is the Slip Stitch Method?
- Supplies Needed
- Steps to Join Granny Squares with the Slip Stitch Method
- Step 1: Preparing Your Squares
- Step 2: Identifying the Corners
- Step 3: Starting the Slip Stitch Method
- Step 4: Joining the Squares in rows
- Step 5: Joining the Squares in columns
- Step 6: Finishing Off
- Tips and Tricks for a Neat Join
- Pros and Cons of the Slip Stitch Method
- Different Variations of Joining Methods
- Whip Stitch Method
- Single Crochet Method
- Invisible Seam Method
- Frequently Asked Questions (FAQs)
- Can I use the slip stitch method to join other crochet projects?
- How do I avoid gaps when joining the squares?
- Can I use a different color yarn for the slip stitch?
- Can I modify the slip stitch method to create a different look?
- Conclusion
Join Granny Squares with the Slip Stitch Method
Are you ready to learn how to join granny squares using the slip stitch method? In this tutorial, I will guide you through the process step-by-step, so you can create beautiful, seamless seam edges for your crochet projects.
Introduction
Crocheting granny squares is a popular technique for creating blankets, afghans, and various other projects. However, the final step of joining the squares can sometimes be challenging. The slip stitch method offers a simple and effective way to achieve clean edges and an overall polished look.
What is the Slip Stitch Method?
The slip stitch method is a crochet technique that uses slip stitches to join the granny squares together. It creates a flat and seamless seam without adding bulk or distorting the shape of the squares. By following a few easy steps, you can achieve a professional-looking finish for your crochet projects.
Supplies Needed
Before we dive into the tutorial, let's gather the supplies you'll need to join granny squares using the slip stitch method:
- Crochet hook: Choose a hook size that matches the weight of your yarn.
- Yarn: Use the same type and color of yarn as your granny squares for a seamless look.
- Scissors: You'll need them to cut the yarn at the end.
Steps to Join Granny Squares with the Slip Stitch Method
Step 1: Preparing Your Squares
Before you start joining your squares, make sure they are all crocheted and blocked to the same size. Blocking will ensure that your squares have a consistent shape and size.
Step 2: Identifying the Corners
To join the squares correctly, it's essential to identify the corners of each square. Some crocheters use stitch markers to keep track of the corners and ensure an even join.
Step 3: Starting the Slip Stitch Method
To begin the slip stitch method, create a slip knot on your crochet hook. The slip knot will serve as the first stitch to join the squares. Start with the chain stitch closest to the first stitch on the square.
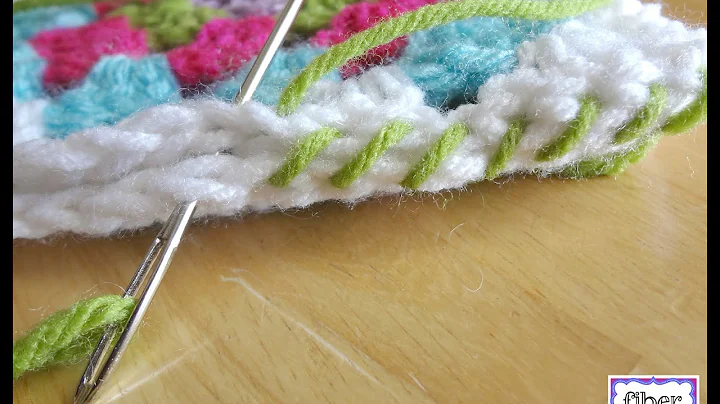
Step 4: Joining the Squares in Rows
To join the squares in rows, insert your hook through the front loop of the first stitch on one square and the corresponding loop on the other square. Yarn over and pull through all three loops to complete the slip stitch. Continue slip stitching across the row, ensuring that your yarn stays under the stitches for a clean seam.
Step 5: Joining the Squares in Columns
Once you have completed joining the squares in rows, turn your work and start joining the squares in columns. Follow the same slip stitch method, ensuring that your yarn stays under the stitches to maintain a neat seam.
Step 6: Finishing Off
After joining all the squares, finish off your work by cutting the yarn and securing the last stitch. Weave in any loose ends to give your project a polished appearance.
Tips and Tricks for a Neat Join
- Always keep track of the corners to ensure an even join.
- Maintain even tension throughout the slip stitching process to avoid a loose or tight seam.
- Use a yarn color that matches your granny squares for a seamless look.
- If you encounter gaps while slip stitching, adjust your tension or consider using a smaller crochet hook.
Pros and Cons of the Slip Stitch Method
Pros:
- Creates a clean and neat edge for your crochet project.
- Easy to learn and suitable for beginners.
- Does not add bulk or distort the shape of the squares.
Cons:
- Requires attention to detail to avoid gaps or uneven stitching.
- Can be time-consuming for large projects with many squares.
Different Variations of Joining Methods
While the slip stitch method is an excellent choice for joining granny squares, there are other methods you can explore to achieve different effects. Here are three popular variations:
1. Whip Stitch Method
The whip stitch method involves using a needle and thread to sew the squares together. It creates a visible seam and adds a decorative element to your project.
2. Single Crochet Method
The single crochet method uses single crochet stitches to join the squares. It creates a more pronounced seam that adds texture to your project.
3. Invisible Seam Method
The invisible seam method, also known as the mattress stitch, creates an almost invisible join between the squares. It is ideal for projects where you want the squares to seamlessly blend together.
Consider experimenting with these different methods to find the one that best suits your crochet project.
Frequently Asked Questions (FAQs)
Q: Can I use the slip stitch method to join other crochet projects?
A: Yes, the slip stitch method can be used to join various crochet projects, such as scarves, blankets, and garments. It provides a clean and polished finish to any joining seam.
Q: How do I avoid gaps when joining the squares?
A: To avoid gaps, make sure to tension your yarn evenly throughout the slip stitching process. Additionally, ensure that your yarn stays under the stitches as you slip stitch.
Q: Can I use a different color yarn for the slip stitch?
A: While it is recommended to use the same color yarn as your granny squares, you can experiment with different colors to create a contrasting effect.
Q: Can I modify the slip stitch method to create a different look?
A: Yes, you can experiment with different stitch combinations or variations to achieve different looks. For example, you can slip stitch through the back loop only for a raised seam or slip stitch through both loops for a bolder join.
Conclusion
Joining granny squares with the slip stitch method is a simple and effective way to create seamless seams and give your crochet projects a professional finish. By following the steps outlined in this tutorial, you can achieve clean edges and a polished look for your blankets, afghans, and more. Remember to practice and experiment with different techniques to find the perfect join for your unique projects. Happy crocheting!
 Beauty


 WHY YOU SHOULD CHOOSE BEAUTYBADY