(Stitch Of The Week) Learn the Chevron Ripple Stitch
Table of Contents
- Introduction
- Pattern Number 206: The 2 Stitch Chevron Ripple Stitch
- Materials Needed
- Sample One: Assortment of Baby Colors with White
- Sample Two: Solid White
- Sample Three: Beautiful Purple and Blues
- Pattern Instructions
- Step 1: Chain and First Double Crochet
- Step 2: Creating the Ripple Effect
- Step 3: Changing Colors
- Step 4: Row 2 - Single Crochet and Chain 2
- Step 5: Row 3 - Double Crochet
- Step 6: Repeating Rows 2 and 3
- Step 7: Finishing Touches
- Tips and Tricks
- Pros and Cons of the 2 Stitch Chevron Ripple Stitch
- Conclusion
Pattern Number 206: The 2 Stitch Chevron Ripple Stitch
The 2 Stitch Chevron Ripple Stitch, also known as Pattern Number 206, is a beautiful crochet pattern that creates an eye-catching ripple effect. This versatile stitch pattern can be used to make a variety of projects, such as baby afghans, blankets, or decorative throws for your home. With its simple yet stunning design, the 2 Stitch Chevron Ripple Stitch is a must-try for any crochet enthusiast.
Materials Needed
Before we dive into the pattern instructions, let's gather all the materials you'll need to create the 2 Stitch Chevron Ripple Stitch. Here's what you'll need:
- Worsted weight yarn (Red Heart Super Saver yarn recommended)
- Size J (10) crochet hook
- Scissors
- Yarn needle (for weaving in ends)
Sample One: Assortment of Baby Colors with White
For the first sample, we will be using an assortment of baby colors with white. This combination creates a soft and delicate look, perfect for a baby afghan or a cozy blanket. Feel free to choose your favorite baby colors and mix them with white to create your unique color palette for this project.
Sample Two: Solid White
If you're looking for a classic and timeless piece, a solid white sample is an excellent choice. A white ripple stitch afghan can effortlessly blend into any bedroom or living room decor, adding a touch of elegance and sophistication.
Sample Three: Beautiful Purple and Blues
For a bolder and more vibrant look, consider using shades of purple and blues for your third sample. This color combination creates a stunning, eye-catching effect that will instantly brighten up any space. Let your creativity shine by selecting your favorite shades within these color families.
Pattern Instructions
Now that we have all the materials ready, let's dive into the step-by-step instructions for creating the 2 Stitch Chevron Ripple Stitch. Follow along to create your very own ripple stitch masterpiece.
Step 1: Chain and First Double Crochet
To begin, you'll need to chain a multiple of 15 plus 1 stitches. For our samples, we will be chaining 46 stitches. If you'd like to crochet along with us, grab your yarn and hook, and let's get started.
Start by double crocheting in the third chain from your hook. Then, work a double crochet in each of the next five chains. This will give you a total of six starting double crochets.
Pro tip: Pay close attention to the chain two space at the beginning of the row. It's there to help the rows go up smoothly, so don't count it as a stitch.
Step 2: Creating the Ripple Effect
The next step is to create the ripple effect that gives the stitch its distinctive chevron pattern. Follow these instructions to achieve the ripple effect:
- Double crochet, chain two, double crochet in the next chain to form the upper point of the ripple.
- Work a double crochet in each of the next six chains to form the downward slope of the ripple.
- Skip the next two chains to create the lower point of the ripple.
- Work a double crochet in each of the next six chains to form the upward slope of the ripple.
This completes the first repeat of the ripple pattern. Continue repeating these steps across the length of your work until you reach the last eight chains.
Pro tip: It's essential to maintain the repeat pattern consistently across the length of your work to ensure the beautiful chevron effect.
Step 3: Changing Colors
If you wish to change colors in your project, now is the time to do so. There are two methods you can use to change colors:
- Method 1 (recommended): Before completing the last yarn over of the final stitch, pull the new color through. Join the new color by pulling it through the loop on your hook. Chain one and turn your work. Crochet over the ends of the previous color to hide them.
- Method 2: Finish the last stitch of the row with the old color, fasten off, and weave in the ends. Join the new color by inserting your hook into the top of the decreased double crochet from the previous row. Pull the new color through the stitch, chain one, and turn your work. Crochet over the yarn ends to hide them.
Choose the method that works best for you and continue to the next step.
Step 4: Row 2 - Single Crochet and Chain 2
For Row 2, you'll be working with single crochet and chain 2 stitches. Follow these instructions:
- Join your new color in the first stitch of the row, chain two, and skip the first stitch.
- Work a single crochet in the next stitch, followed by one single crochet in each of the next five stitches. This will give you a total of six single crochets.
- Repeat the pattern of six single crochets followed by a chain two in the next stitch until you reach the last chain two space of the previous row.
Pro tip: Take your time in this row to ensure you skip the first stitch and work a single crochet in each stitch as instructed. This will help maintain the correct stitch count and keep the pattern consistent.
Step 5: Row 3 - Double Crochet
Row 3 brings back the double crochet stitch. Here's how to work this row:
- Join your new color in the first stitch of the row and chain two.
- Skip the first stitch and work a double crochet in the next single crochet.
- Work a double crochet in each of the next five single crochets.
- Repeat the pattern of one double crochet in each stitch until you reach the chain two space at the beginning of the repeat.
Continue repeating Rows 2 and 3 to create the beautiful ripple stitch pattern. Remember to alternate the stitches and follow the instructions carefully for each row.
Step 6: Repeating Rows 2 and 3
To create the full chevron effect, repeat Rows 2 and 3 in their respective order. This will continue building the ripple pattern throughout your work. Follow the same instructions for each row until you reach your desired length.
Pro tip: Pay attention to the top and bottom points of the ripple to ensure they line up correctly. This will give your finished piece a polished and balanced look.
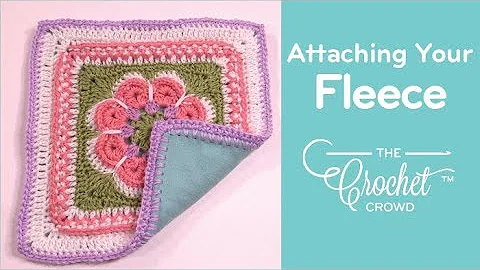
Step 7: Finishing Touches
Once you've completed the desired length for your project, finish off your work by fastening off and weaving in any remaining ends. Use a yarn needle to neatly secure the loose ends within your stitches, ensuring they are hidden from view.
Congratulations! You have successfully created the beautiful 2 Stitch Chevron Ripple Stitch. Take a moment to admire your work and enjoy the ripple effect you've created.
Tips and Tricks
- If you prefer a larger or smaller project, adjust the length of your starting chain accordingly. Remember to maintain a multiple of 15 plus 1 stitches.
- Experiment with different color combinations to create unique and personalized ripple stitch projects.
- Take breaks when needed to avoid strain and fatigue in your hands and fingers.
- Use stitch markers to help you keep track of your stitches if necessary.
Pros and Cons of the 2 Stitch Chevron Ripple Stitch
Like any crochet stitch pattern, the 2 Stitch Chevron Ripple Stitch has its own pros and cons. Here's a quick overview:
Pros:
- Creates a visually appealing ripple effect
- Versatile stitch pattern suitable for various projects
- Can be easily customized with different color choices
- Adds a touch of texture and dimension to your work
Cons:
- Requires concentration to maintain the pattern's repeat
- Not suitable for beginners who are still learning basic crochet stitches
- May take some practice and patience to master the tension and stitch alignment
Conclusion
In conclusion, the 2 Stitch Chevron Ripple Stitch is a beautiful crochet pattern that can elevate your projects to the next level. With its eye-catching ripple effect, this stitch is sure to impress and inspire your creativity. Follow the step-by-step instructions provided, keep our tips and tricks in mind, and you'll be well on your way to creating stunning ripple stitch masterpieces.
Thank you for joining us on this crochet adventure. Grab your hooks, choose your favorite colors, and let's get stitching with the fabulous 2 Stitch Chevron Ripple Stitch!
Highlights
- Create stunning ripple effects with the 2 Stitch Chevron Ripple Stitch
- Versatile stitch pattern suitable for various projects
- Step-by-step instructions for easy understanding
- Tips and tricks to enhance your crocheting experience
- Customize your projects with different color combinations
- Pros and cons to consider before starting your project
FAQ
Q: Can I use a different yarn weight with the 2 Stitch Chevron Ripple Stitch?
A: While the pattern suggests using worsted weight yarn, you can experiment with different yarn weights to create unique effects. However, keep in mind that using a different yarn weight may require adjustments to the starting chain and hook size.
Q: Can I use this stitch pattern for a scarf or shawl?
A: Absolutely! The 2 Stitch Chevron Ripple Stitch can be used for a wide range of projects, including scarves and shawls. Adjust the starting chain length to achieve your desired width, and repeat the pattern rows until you reach the desired length.
Q: How long does it take to complete a baby afghan using this stitch?
A: The time it takes to complete a baby afghan using the 2 Stitch Chevron Ripple Stitch depends on various factors, such as your crocheting speed, the size of the afghan, and the complexity of the pattern. It's best to set aside dedicated crochet time and work at your own pace.
Q: Can I mix different stitch patterns within the same project using the 2 Stitch Chevron Ripple Stitch?
A: Absolutely! Feel free to combine the 2 Stitch Chevron Ripple Stitch with other compatible stitch patterns to create intricate designs and textures. Just make sure to plan your design beforehand and consider how the different stitch patterns will complement each other.
 Beauty


 WHY YOU SHOULD CHOOSE BEAUTYBADY